
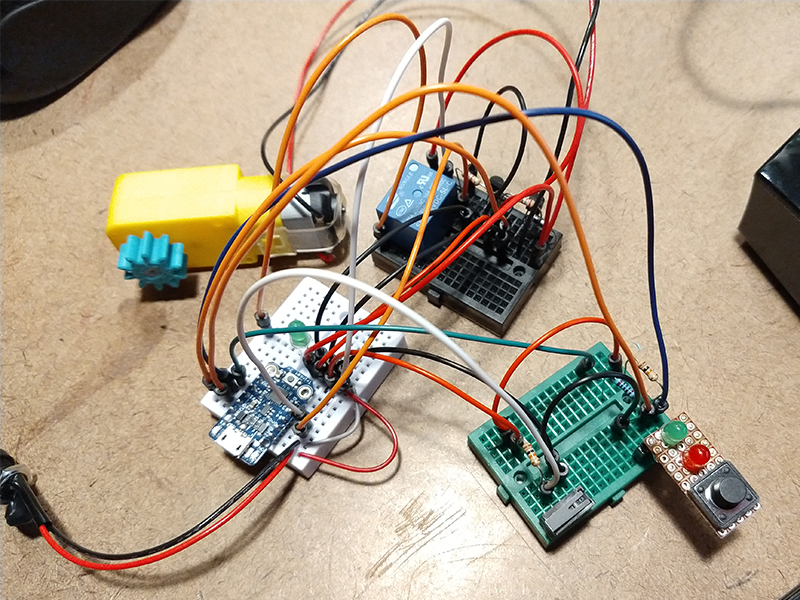
The above image is the initial prototype layout of the electronics for the sanitizing chamber. There are probably different and better ways to implement this, but since I am not an electronics expert and for this first version this is plenty sufficient to prove out the concept. I am using all components that I had on hand already for ease of prototyping (except of course the Aquarium UV-C Bulb).
I am using a 3.3v Adafruit Trinket as the micro controller and using all 5 of its pins. A 3.3v wall power supply will drive the microcontroller, motor, relay and leds, etc. This is actually a little lower than what is recommended (4.5v) for the 3.3v trinket version but seems to work fine. The low pressure mercury vapor UV-C Aquarium bulb has its own little power supply rated at 24-36V, which I am assuming a range is listed because it’ll draw differently at startup than when already ignited. Ideally of course one would certainly only want a single power supply for a product, but for ease of integration and quick implementation for now, this the bulb power will be a separate subsystem turned on/off by the relay. So the bottom of the cleaning chamber will have 3 plug ports: 3.3v, Aquarium bulb power supply and the trinket usb micro so I can tweak the code.
For safety, I do not want a user to be able to see the UV-C light while it is running if they were to open the lid, so I am adding a little limit switch so the system knows that the lid is closed (laid out here on the green breadboard). If the lid is opened the system will immediately stop everything and turn the UV-C bulb off via the relay.
The motor to drive the mask rotation system is a common hobby “TT Motor”. I wanted a gear motor to have enough torque and also to make all the mask rotation be as slow as possible. I would prefer to use something like an N20 gear motor as they come in a range of gear ratios but they are actually kind of expensive in small quantities. So, This 1:120 “TT” gear motor is readily available and can run at 3V. I am using a transistor with it so I can pwm’d down as slow as possible while still being able to drive everything.
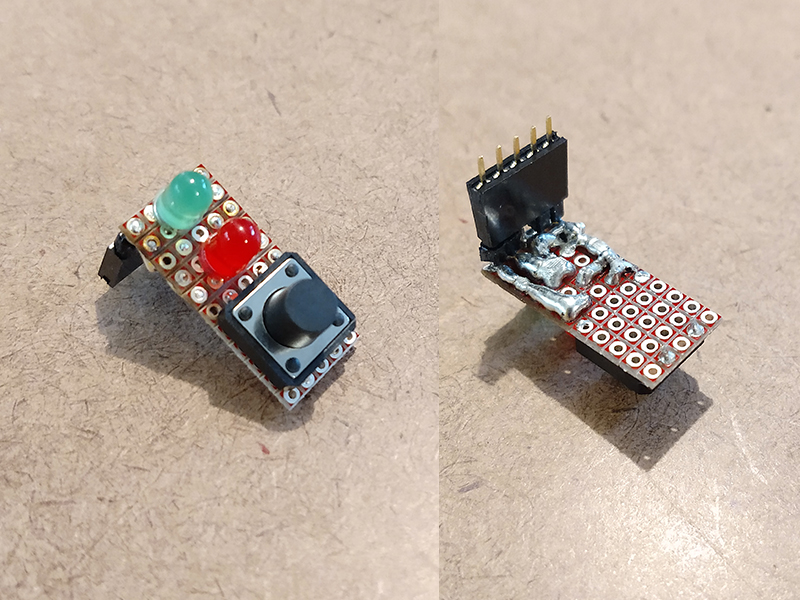
The above image shows the little daughter board for the main user control interface which will be located near the top of the machine, separate from the main board. The plan is when the top door is closed (checked via limit switch) and the user presses the button, the red light is on during the sanitizing cycle. One the the cycle is complete, the green light stays on until the door is opened. If the door is open and the user presses the start button, the green light will flash (signifying an error). Since there are only 5 pins on a trinket, I have run out, so the Red LED is actually inline with the motor pin, which works because the motor is only turning when it is sanitizing. The solder joints/traces on the back side are pretty crude, but they get the job done.

The above image shows the much cleaned up and refined electronics. I was able to squeeze all of the wires and components on to the single white breadboard. This breadboard will be actually be somewhere in the bottom section of the cleaning chamber (not in the actual UV-C illuminated part). The green and red breadboards are just place holders to represent that there will be a cable harness connecting to the daughter control board and a cable harness connecting to the safety limit switch for the lid.
I am using a 3.3v Adafruit Trinket for the microcontroller as I had it on hand already. I really like the Trinket platform as they are just so very small, easy to use, Arduino compatible and I have used them on a ton on other product prototyping projects before with great success/integration. I actually really wanted to try out the newer and more powerful M0 Trinket version but unfortunately they have been sold out for quite some time. I also leaned of the Seeeduino XIAO recently, which looks very interesting too, as it is very small as well, but offers even more I/O pins and a low cost.

